Configuring Support for Microsoft Remote Desktop Services
This
Before You Begin
Supported Components and Endpoint Devices
Review the Imprivata OneSign Supported Components guide to confirm that your Remote Desktop Services environment meets all of the minimum or recommended requirements.
Communication Ports
The following ports are utilized with Remote PC RDP automation.
| Port | Protocol | Direction |
|
135 |
TCP | Two-way |
| 49666 | TCP | Two-way |
Session Persistence
Session persistence (roaming) is managed by your virtual environment, not Imprivata Virtual Desktop Access. If your virtual environment is configured correctly for session persistence, Imprivata Virtual Desktop Access seamlessly roams user sessions, on authentication, to the endpoint computers in your environment.
NOTE: For more information about configuring session persistence, see your vendor–specific documentation.
Microsoft Session Collection Limitations
While Imprivata Virtual Desktop Access supports both Microsoft Remote Desktops and Microsoft RemoteApps delivered through a single broker, Microsoft does not support mixed session collections of these resource types.
If you intend to deploy both Remote Desktops and RemoteApps to your end users, review Microsoft's guidance on Session Collection creation and plan your server deployment accordingly.
For more information, see the Microsoft TechNet article concerning mixed session collections:
https://social.technet.microsoft.com/wiki/contents/articles/10817.publishing-remoteapps-in-windows-server-2012.aspx
Note the Required RDS Connection Information
Configuring support for Microsoft RDS requires specific connection details about the deployment. The required information depends on the type of resources users have access to and how they are accessing them.
To support access to session-based and virtual desktops (hosted desktops) using Remote Desktop (RD) Web Access, an Imprivata agent must connect to the RD Connection Broker (RD Broker) that is managing the requests for the hosted desktops.
Note the fully qualified domain name (FQDN) or IP address of the RD Broker. You enter this information when configuring the Imprivata connection to Microsoft RDS.
To support access to RemoteApp programs using RD Web Access:
-
An Imprivata agent must connect to the RD Connection Broker (RD Broker) that is managing the requests for the RemoteApp programs.
Note the FQDN or IP address of the RD Broker. You enter this information when configuring the Imprivata connection to Microsoft RDS.
-
Additionally, note the names of each of the RemoteApp programs.
You must enter the names exactly as they appear in the Microsoft Server Management console when configuring the Imprivata connection to Microsoft RDS.
Users can access session-based, virtual, or physical PC desktops using a Remote Desktop Connection (RDC). This is commonly required when the deployment does not include an RD Connection Broker (RD Broker).
Note the IP addresses or host names of these desktops. You enter this information when configuring the Imprivata connection to Microsoft RDS.
Configure the RD Session Hosts for Single User Sessions
If your environment includes session-based desktops or RemoteApp programs, configure the RD Session Hosts to restrict users to a single RDS session.
To configure the required local policy setting:
-
From the Windows Server that is running the RD Session Host role service, open a command prompt window and enter gpedit.msc to open the Local Group Policy Editor.
-
Go to Computer Configuration > Administrative Templates > Windows Components > Remote Desktop Services > Remote Desktop Session Host> Connections.
-
Double-click Restrict Remote Desktop Services to a single Remote Desktop Services session to edit the policy setting.
-
Select Enabled and click OK.
-
Repeat these steps for each Windows Server running the RD Session Host role service.
Best Practices and Limitations
Review the following best practices and limitations.
When configuring the RD Broker URL in the Microsoft Remote Desktop Services - RemoteApp section, use the format of https://rdshbroker.mycompany.com/ instead of the example displayed in the Imprivata Admin Console interface.
The /RDWeb part of the path is not applicable to Dell Wyse thin clients.
It is best practice to configure RD Brokers to communicate over SSL.
NOTE: Exterior links not controlled by Imprivata may change without notice.
Automating access to multiple RemoteApp programs from multiple RD Brokers can result in unexpected behavior. If the deployment contains multiple RD Brokers, note the RemoteApp programs and their respective RD Brokers to help facilitate user policy planning.
BEST PRACTICE: Limit the user policy to automate access to one RemoteApp program per RD Broker.
If the deployment includes RemoteApp programs that open in two or more windows when started, roaming the RemoteApp programs can result in unexpected behavior.
BEST PRACTICE: Limit the user policy to a single RemoteApp program per RD Broker, if the program opens in multiple windows.
Installation Sequence
If the deployment includes an RD Virtualization Host, install the Imprivata single-user agent or the shared-kiosk agent on each virtual machine.
If the deployment includes session-based desktops or RemoteApp programs, install the Imprivata Citrix or Terminal Server agent on each RD Session Host.
If the deployment includes physical endpoint computers, install the Imprivata single-user agent or the shared-kiosk agent on each endpoint computer.
The Imprivata agent must be installed on each endpoint computer on which Virtual Desktop Access is to be used.
You can push the installation to groups of computers or install the Imprivata agent on one computer at a time, depending on your organization's preferences.
NOTE: To configure Imprivata ProveID Embedded SUSE Linux thin clients, see Installing and Configuring ProveID Embedded on Linux Thin Clients.
To support Microsoft RDS, an Imprivata agent must connect to a RD Broker or directly to a session-based, virtual, or physical endpoint computer.
-
In the Imprivata Admin Console, go to the Computers menu > Virtual desktops page > Microsoft section.
- Do one or more of the following:
 Configure the connection to desktops
Go to the Microsoft Remote Desktop Services – session-based and virtual desktop clients section.
Enter the names or IP addresses of the RD Brokers that are managing the requests for hosted desktops.
-
Go to the Microsoft Remote Desktop Services – RemoteApp section.
-
Enter the names or IP addresses of the RD Brokers that are managing the requests for RemoteApp programs.
For Dell Wyse thin clients, use the format of https://rdshbroker.mycompany.com/ for the RD Brokers. Do not use the /RDWeb part of the path.
-
Enter the names of the RemoteApp programs.
-
Select an authentication method from the Authenticate using list.
NOTE: The authentication method applies to the specified RD Broker, not per RemoteApp program.
-
Go to the Microsoft Remote Desktop Services – Remote PC section.
-
Enter the names or IP addresses of the session-based, virtual, or physical desktops.
-
Select an authentication method from the Authenticate using list.
-
Select Allow authentication from all Remote Desktop Services - RemoteApp apps.
-
Click Save.
NOTE: You must spell the program names exactly the same, including spacing and capitalization, as they appear in the Microsoft Server Management console.
Create, configure, and assign a computer policy that automates endpoint computer access to Microsoft RDS.
Endpoint computers and virtual applications are assigned the Default Computer Policy unless:
-
A different computer policy is manually assigned.
-
A different computer policy is automatically assigned by computer policy assignment rules.
Review the Default Computer Policy settings to confirm that they are appropriate for your virtual desktop environment.
Step 6a: Create a Computer Policy for Endpoint Computers
-
In the Imprivata Admin Console go to the Computers menu > Computer policies page.
You can select an existing computer policy from the list, or make a copy of the Default Computer Policy as a starting point. If you want to edit an existing computer policy, click the existing computer policy name, and skip to step 7b.
-
To copy the Default Computer Policy, select Default Computer Policy , then click Copy.
-
Click Default Computer Policy (2).
-
Rename the computer policy.
Step 6b: Configure the Computer Policy for Endpoint Computers
-
Click the Virtual Desktops tab and go to the Microsoft section.
- Do one or more of the following:
Automate access to desktops
Go to the Microsoft Remote Desktop Services – session-based and virtual desktops section.
Select Automate access to session-based and virtual desktops.
Select Prompt the user only if they have multiple desktops to streamline the hosted desktop experience for users.
NOTE: If you are configuring single-user computers for virtual desktops, and a user is entitled to multiple desktops, you can prevent them from having to choose which one to launch by configuring a registry key (DesktopToAutoLaunch) on the Windows endpoint. For more information, see Step 8: (Optional) Override the Desktop Chooser.
You can control the behavior when an endpoint computer is locked:
Select Keep Remote Desktop and user session active to preserve the user session. When a user logs back into the endpoint or roams to another endpoint, the desktop and any applications are preserved just as they were when the first desktop locked.
Select Shutdown the Remote Desktop and disconnect the user session to help optimize resource consumption and minimize the total number of active sessions in use in the enterprise. When a user logs back into the endpoint computer or roams to another endpoint computer, the desktop relaunches.
Select the RD Broker(s) that are managing the desktop requests.
Automate access to RemoteApp programsGo to the Microsoft Remote Desktop Services – RemoteApp section.
Select Automate access to RemoteApps.
You can control the behavior when an endpoint computer is locked:
Select Keep the remote applications and user session active to preserve the user session. When a user logs back into the endpoint or roams to another endpoint, the RemoteApp programs are preserved just as they were when the endpoint computer locked.
Select Shutdown the remote applications and disconnect the user session to help optimize resource consumption and minimize the total number of active sessions in use in the enterprise. When a user logs back into the endpoint computer or roams to another endpoint computer, the RemoteApp programs relaunch.
Select the RD Broker(s) that are managing the RemoteApp requests.
Automate access to Remote PCsGo to the Microsoft Remote Desktop Services - Remote PC section.
Select Automate access to Remote PC.
NOTE: Unlike hosted desktops, you cannot specify if a user is prompted to choose a desktop. By default, if the user policy automates access to one desktop, the desktop launches automatically; if the user policy automates access to more than one desktop, the user is prompted to choose which desktop to launch.
-
Click Save.
Step 6c: Assign the Computer Policy to Endpoint Computers
Assign the computer policy to the endpoint computers.
Manually Assigning the Computer Policy
To assign the computer policy:
-
In the Imprivata Admin Console, go to the Computers menu > Computers page.
-
Select the computers to which to assign the computer policy. You can use Search for Computers to enter search criteria.
-
Click Apply Policy.
-
Select Choose a policy for the selected computers, choose the policy from the list, and then click Apply Policy.
Automatically Assigning the Computer Policy
Computer policy assignment rules let you assign a policy to existing endpoint computers and make sure that the policy is automatically assigned to endpoint computers that are added later.
To use a rule to assign the computer policy:
-
In the Imprivata Admin Console, go to the Computers menu > Computer policy assignment page.
-
Click Add new rule.
-
Name the rule and select the assignment criteria.
-
Select the policy you created and click Save.
BEST PRACTICE: When assigning a computer policy to ProveID Embedded thin clients only, select Imprivata agent type > ProveID Embedded.
Create and apply a user policy that automates user access to RDS hosted applications.
Step 7a: Create a User Policy
-
In the Imprivata Admin Console, go to the Users menu > User policies page.
-
You can select an existing user policy from the list, or make a copy of the Default User Policy as a starting point. If you want to edit an existing user policy, click the existing user policy name, and skip to step 6.
-
To copy the Default User Policy, select Default User Policy, and then click Copy.
-
Click Default User Policy (2).
-
Rename the user policy.
-
Click Virtual Desktops.
- Select Enable virtual desktop automation and do one of the following:
Enable access to desktops
- Select Automate access to full VDI desktop > Microsoft. If additional applications are available to launch on the desktop, they appear in the right pane.
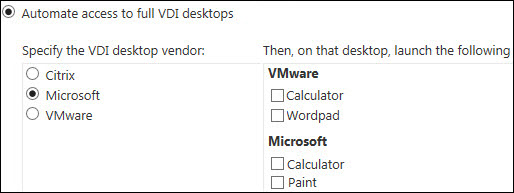
Optional – If you want to automatically launch RemoteApp programs on top of the hosted desktop, select them from the right-pane.
Enable access to RemoteApp programsSelect Automate access to applications or published desktops.
Select the RemoteApps from the left pane only.
NOTE: Unlike Citrix XenApp and VMware Horizon View RDS Hosted Applications, a RemoteApp program is an application only, not a desktop. Do not select additional programs from the right pane.
- Select Automate access to full VDI desktop > Microsoft. If additional applications are available to launch on the desktop, they appear in the right pane.
- Select Automate access to Remote PC.
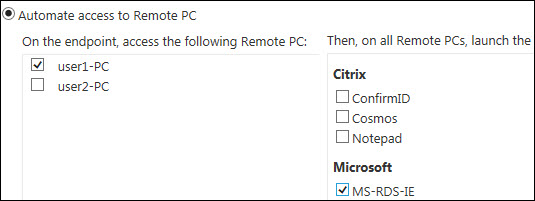
-
Select one or more remote PCs from the left pane. If additional applications are available to launch on the desktop, they appear in the right pane.
-
Optional – If you want to automatically launch RemoteApp programs on top of the remote PC, select them from the right-pane.
-
Click Save.
Step 7b: Apply a User Policy
-
In the Imprivata Admin Console, go to the users page Users menu > Users page .
- Select the users to which you want to apply the user policy.
You can view additional pages of users without losing your selections. The users that you select are saved and a counter on the top of the page lists the number of selected users.
BEST PRACTICE: To select multiple users more efficiently, use the Search for Users tool at the top of the Users page. The tool offers search parameters for refining your results.
- Click Apply Policy.
- Choose a policy, and then click OK.
By default, when a user is entitled to multiple desktops, they are prompted to choose which one to launch.
If you are deploying single-user computers, you can override this behavior by configuring a registry key (DesktopToAutoLaunch). This registry key streamlines desktop access by letting you specify which desktop should automatically launch for the user on the Windows endpoint.
To specify which desktop should be launched:
1. From the endpoint, open the Registry Editor.
2. Create the following registry key:
| Name | Data Type | Location | Value |
|---|---|---|---|
| DesktopToAutoLaunch | String |
HKEY_LOCAL_MACHINE\SOFTWARE\SSOProvider\VDI |
<name_of_virtual_desktop_as_it_appears_in_the_chooser> |
Branding Login and Enrollment Screens
You can display your corporate logo on the Imprivata login and enrollment screens for Imprivata single-user and shared-kiosk workstations. See Branding the Login and Self-Service Experience.